
The high-pressure test-facility of TransCanada Calibrations Ltd. has been in operation since March 2000 after its commissioning and first calibration by NMi VSL-Flow. The test-facility of TCC has been designed for international traceable calibrations of gas meters with diameters varying between 50 and 900 mm at line velocities up to 30 m/s. The maximum actual flow rate equals 55000 m3/h at a pressure between
6.0 MPa and 7.0 MPa (60-70 bar) and a temperature of approximately 25 °C.
VSL has operated high-pressure calibration facilities in the Netherlands for over 35 years.
Since 1999 VSL has harmonized the traceability for the high-pressure gas volume measurements with PTB (Germany). In 2004 LNE (France) joined the harmonization and in 2013 FORCE (Denmark). The harmonization process is developed by VSL and PTB and is constantly improved with the partners.
The advantage of the harmonization process is that the partners disseminate equal reference values (no significant biases) and that the traceability chains are more stable and with smaller uncertainties.
Linking to this traceability framework provides a reliable and traceable reference for the TCC test- facility.
See link below for the TCC traceability flow chart used from 1999 to 2017
TCC Traceability Chart 1999-2017
See link below for the TCC traceability flow chart used from 2017 to Present
TCC Traceability Chart 2017-Present
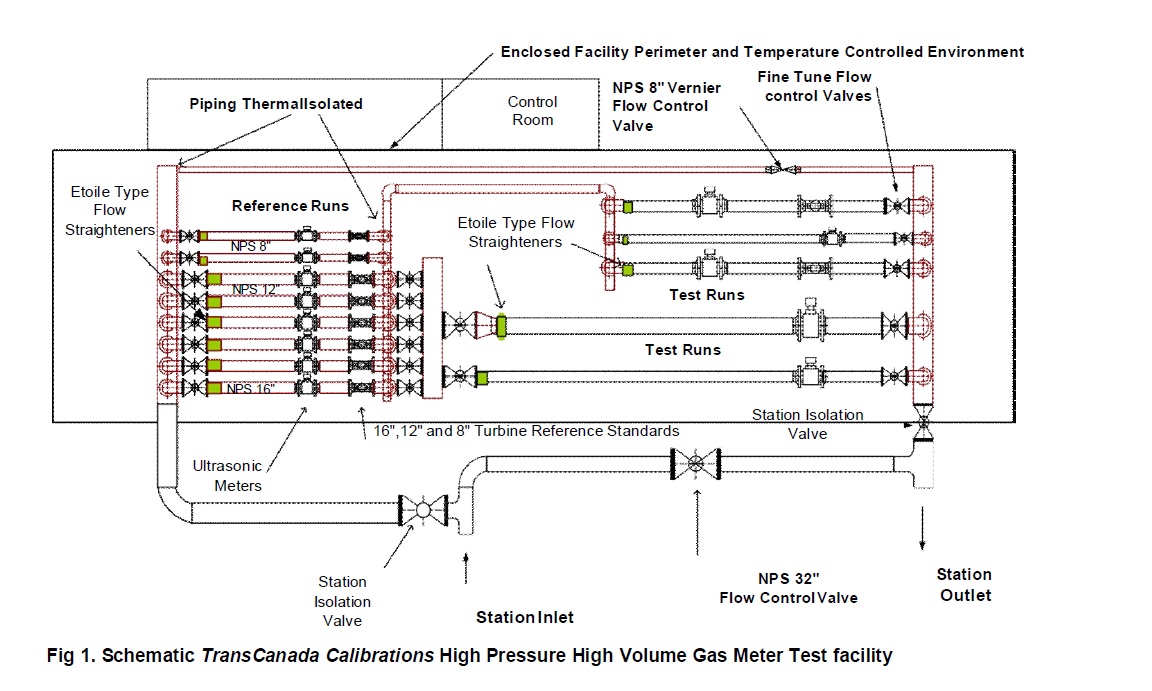
The test-facility is located at a by-pass downstream of a gas compressor station delivering gas flows up to 55,000 m3/hr at a pressure ranging between 6.0 MPa and 7.0 MPa. The by-pass line is equipped with a 800 mm diameter control valve. Opening the station isolation valves and closing the control valve forces gas through the station. A second 200 mm by-pass control valve serves as a vernier control.
The facility consists of five parallel runs with reference meters with diameters of 400 mm encompassing up to 10,000 m3/h each. Further a single run of 300 mm with 4000 m3/h capacity and two runs of 200 mm with up to 1600 m3/h each are in parallel to the earlier mentioned 400 mm reference runs. Each reference run is configured with upstream a matched size ultrasonic meter and downstream a turbine meter. There are five test runs available for the calibration and testing of gas meters with diameters between 200 mm and 900 mm. A schematic overview of the general configuration is shown in Figure 1.

TCC 20th Anniversary in 2021August 10th, 2021
TCC first began commercial operation in March of 2000. We will be celebrating our 20th anniversary next year. Stay tuned! .....